Using Proxifier For Security & To Bypass Restrictions
The internet is exciting because it has many applications, but you can be exposed to some security risks. Therefore, it is crucial to protect your privacy and online information. When you access a web page, your IP address interacts with the browser, which delivers data on your location. Subsequently, you can’t access some websites because they have configurations to block all IP addresses from a location. This is where using proxifier with NetNut proxies come into play.
The solution to these challenges is Proxifier, a sophisticated proxy client that allows users to route their network through proxy servers.
This guide will examine Proxifier, its benefits, and how to integrate it with NetNut proxy, as well as some frequently asked questions.
Proxies and IP Address
Before we dive deeper into the core of this guide, let’s briefly go over proxies and IP addresses. What they are and why it is important for you to fully understand.
What Are IP Addresses?
An IP address is your device or network’s unique numerical identifier when you connect to the internet. An internet service provider often assigns this number, which is your device address as it interacts with various online platforms.
What Are Proxies?
Proxies or a proxy server is a tool that is used as an intermediary gateway between a user and the web requests they are executing on the internet. The unique function of a proxy is to hide your real IP address so that the websites you visit cannot determine your device location. You can also use it to change your location so the website believes your device communicates with it from a predefined location. Therefore, this enhances the security and privacy of your online activities. While proxies may seem like the perfect solution, they have one limitation that must be addressed. Some applications do not support proxies, which puts you in a difficult situation.
So, what is the way out of this challenging situation? Proxifier, which we will discuss in detail throughout this guide, is the unique solution. Subsequently, if the application does not support the use of a proxy, you need to integrate it with Proxifier to revolutionize your online experience.
What is Proxifier?
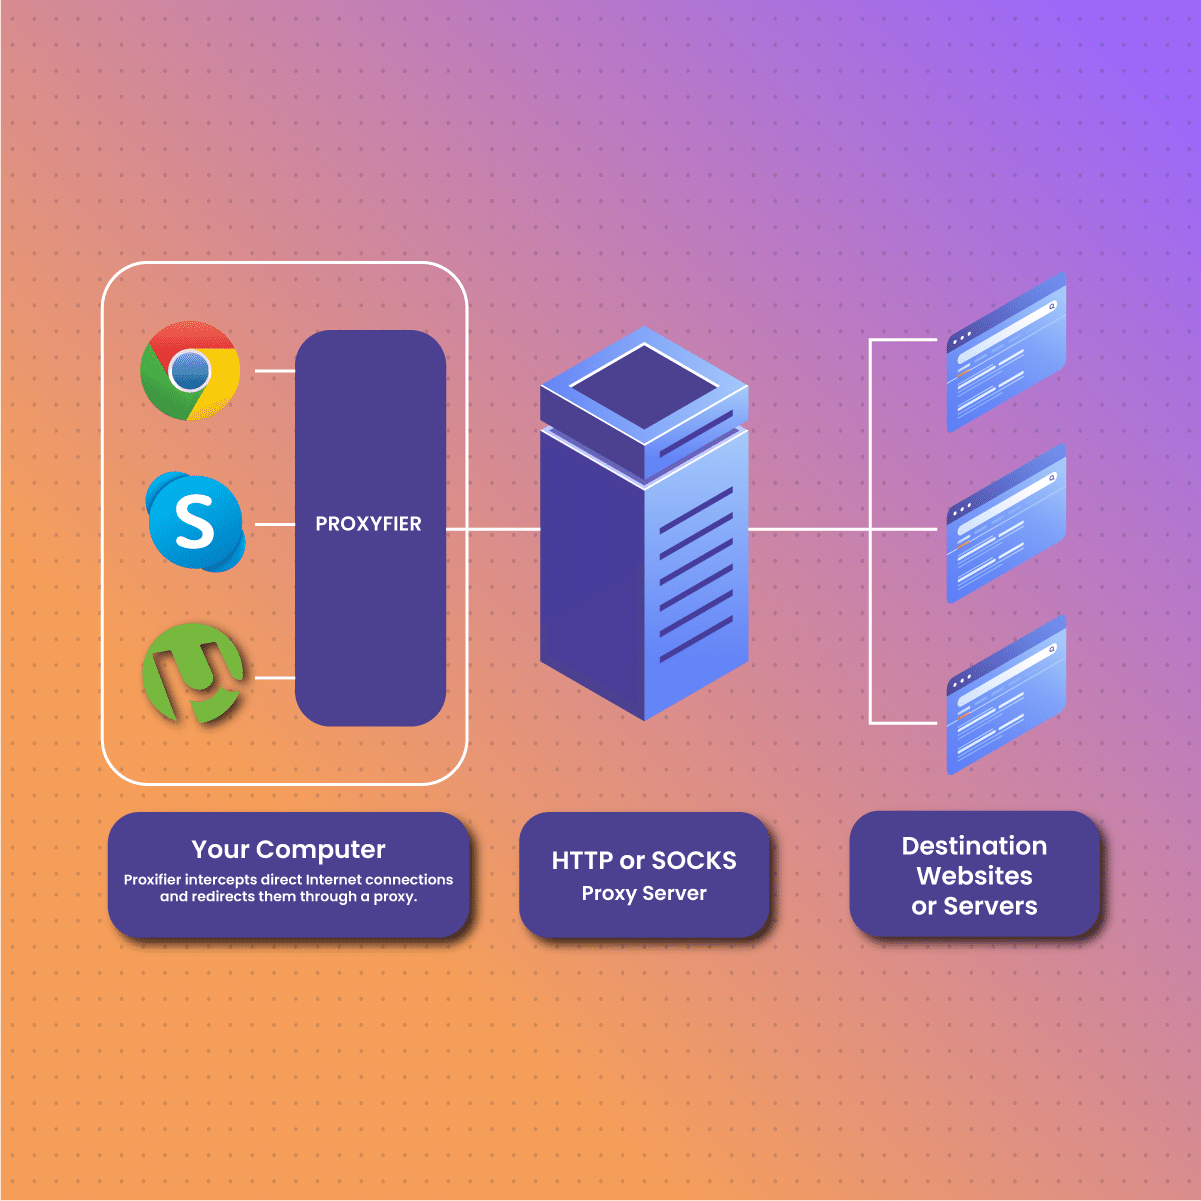
Proxifier is a program that allows network applications to send requests with a proxy server, especially those without built-in proxy settings. It can take any app and channel your connections through encrypted channels to hide your IP address. In simpler terms, Proxifier can force programs to work with proxy servers even if it’s not in their default setting.
Proxifier is an excellent tool that can be used in place of VPNs, proxy load management, traffic encryption, accessing restricted content, switching between multiple proxies, and more. However, it does not provide support for Russian users, so they may experience some technical difficulties.
This tool can be used to optimize corporate networks. Imagine a corporate network with over 400 computers; managing it may not be easy. However, you can use this proxy management software to manage these networks from a central point to ensure efficiency.
Another application is gaming- let’s assume a player in Russia has problems with connection when playing on a UK server. Subsequently, international game gamers may optimize their experience by integrating a proxy with Proxifier.
What are the Benefits of Using Proxifier?
Optimized performance
The primary benefit of Proxifier is that it optimizes network performance. It allows customers to use multiple proxy servers and choose the most effective and secure route for network traffic. Subsequently, there is an overall improvement in the network speed and responsiveness, which can make your online experience better.
Privacy and security
Some websites can collect your data without your permission when you visit them. However, Proxifier enhances privacy by hiding your IP address and encrypting the network. Apart from privacy, the encryption protects you from potential attacks by hackers, who may want to gain access to your devices. This layer of encryption ensures your data remains safe, optimizing your safety and privacy so you can enjoy the internet without worries.
Location restriction
If you have ever experienced geo-restrictions, you can understand how frustrating it can be, especially when there are not a lot of other options available on the internet. Proxifier can route your network through proxy servers available in the target location to help you access geo-restricted content. Therefore, you can get access to shows, services, websites, articles, and images regardless of your country.
Overcome network limitations
A significant application of Proxifier is bypassing network limits placed by governments, companies, or internet service providers. Therefore, it allows you to access websites and content inaccessible to others within your region. This software allows you to say goodbye to restrictions to have an extensive and immersive online experience.
Compatibility
Another reason to use this tool is that it is compatible with email clients, FTP clients, web browsers, instant messengers, and others. This broad range of compatibility ensures that it can seamlessly integrate with your digital routine across various platforms to elevate your online activities.
User-friendly interface
This tool stands out because it has a user-friendly interface, which means installing and setting up is pretty straightforward. As a result, novices and professionals can easily use this solution to enhance their online activities.
Flexible proxy management
Proxifier offers flexible proxy management, which allows users to switch between proxy servers with ease. Therefore, you can easily switch to a proxy server based on your online needs while optimizing network performance.
How To Setup Proxifier and Integration with Proxies
Now that we have a basic understanding of Proxifier, let us examine how to install the tool. Follow the steps below to install Proxifier on Windows:
Step 1: Install Proxifier
The first step is to install the software. Go to the official website to install either the basic or standard version of Proxifier to get started.
Step 2: Open Proxifier
Secondly, open it on your computer. Meanwhile, ensure the proxy server is available for use. Click on the Profile tag to view a mini drop-down menu and select Proxy Servers.
Step 3: Add the IP address
Select Add to input the IP address and port of the proxy server. The default Protocol is SOCKS version 5, but you can choose from the provided options. Once you are done inputting the details, click OK.
Example of an IP: 101.601.0.1
Example of a hostname: en.proxyprovider.net
Example of Port: 2020 (this is the number at the end of a hostname or IP, and it is often separated with a colon)
Step 4: Set up authentication
Turn on the authentication feature by clicking on Enable. Input your login details, including Username and Password, in the boxes provided. Most proxy servers require authentication before you can start using it. Generally, there are two authentication methods: credentials and whitelisting. You may skip this step if you have whitelisted your IP. But if the reverse is the case, you need to input your credentials as discussed.
Step 5: Determine the default settings
Once you are done setting up, click OK. A new pop-up window asks if you want Proxifier to use this proxy by default for all applications. Select Yes or No based on your needs.
Step 6: Test the proxy server
You want to be sure the proxy server is working before exploring the internet. Go to your list of proxy servers, select Check, and then Start Testing so that Proxifier can ascertain if the proxy server is functional.
You can also change the target website for testing by selecting Proxy Checker Settings and entering the new domain of your choice. Click OK to integrate the changes to the Proxifier.
Step 7: Enable HTTP proxy server connection
Click Advanced (the last option on the list) from the Profile tab and select HTTP Proxy Servers. A mini drop-down window appears with the option to Enable HTTP proxy servers support. When you select the box, you can add HTTP proxy servers in the Proxy Settings menu.
In addition, it comes with a warning that you can only use an HTTP proxy server for HTTP connections. Subsequently, it won’t work with HTTPS connections, and HTTPS proxy serves
Step 7: Final stage
Once you have made a careful decision, you can either select OK to integrate the changes you made or Cancel to revert to the previous settings.
Congratulations, you have successfully installed the proxy management tool, added proxy servers, and configured it to take your online experience to the next level.
The above guide allows it to channel all your network requests through a proxy server and enable support for HTTP proxies.
Using a Proxy Server with a Particular Application
Instead of sending all the traffic on your device through a proxy server, you can use one for a single application. This is particularly useful when you have multiple applications, like a game console and a browser, and want them to have different proxies.
Step 1
To avoid unnecessary repetitions, please refer to steps 1-4 above. The same steps are required in this situation.
Step 2: Configure the proxification rules
On the home menu, click Profile and select Proxification Rules. This will display a mini window where you click Add. It will take you to the page where you can add the rules. Start by adding the Name- it can be whatever you want.
The next step is to select the Application by clicking Browse, which opens a window to view the File Explorer.
For the sake of this guide, let us imagine we want to integrate a browser like Chrome. When the File Explorer window opens, select Chrome.
Still on the Proxification Rule window, click on Actions. There are three options- direct the Application’s network through a proxy server, use your direct connection, or block it from accessing the internet. Click OK to confirm the changes on the window.
Step 3: Enable rule
In step 2, we created a rule- you can have multiple rules. However, the rules follow an order- the ones above precede others below them. Therefore, you can use the arrow button on the right side of the rules to move them up or down based on your preferences.
Proxifier often comes with a Default rule, which usually applies to all the networks on your device.
Step 4: Test the proxy server
As discussed in the earlier part, testing the proxy server is a necessity. This guarantees that all your configurations work just like you want them to.
Why Should you Choose NetNut?
Since Proxifier does not have a proxy server, you need one. It is not enough to choose any proxy server; you need one like NetNut, an industry-leading expert.
NetNut has an extensive network of over 52 million rotating residential proxies in over 200 countries and over 250,000 mobile IPS in over 100 countries, which helps them provide exceptional data collection services.
NetNut offers various proxy solutions, including rotating proxies. They provide an unmatched degree of anonymity, which can help minimize IP bans. In addition, NetNut proxies can bypass geo-restriction. Therefore, when integrated with a proxy management tool, it is excellent for accessing restricted content.
Whatever you need, NetNut is a guaranteed partner; especially if you need customized mobile solutions, NetNut has got you covered.
Final Thoughts on Intergrating Proxifier With NetNut Proxies
This guide has examined Proxifier, an exceptional tool for everyone who uses the internet. Although it is paid software, you get a trial period of 30 days which you can cancel at any time.
Integrating NetNut’s secure service with Proxifier’s capability to channel your network through a proxy gives you more control over your online activities. This integration offers optimized speed, enhanced privacy, and the ability to manage your activities efficiently.
We hope this guide helps you set up. If you have any questions on how to select the best proxy for your needs, our in-house experts are always available to assist you.
Contact us today to get started!
Frequently Asked Questions About Proxifier
Does Proxifier support Android, Linux, and Mac?
Proxifier supports Mac and Windows. However, it is not compatible with Linux OS or Android.
Alternatively, you can use Postern for Android and Proxychains for Linux.
Is Proxifier a proxy server?
No, Proxifier is not a proxy server, nor does it come with one. As a result, you have to purchase a proxy server like NetNut, which can be integrated into Proxifier.
Does Proxifier have a free plan?
No, Proxifier does not have a free plan. However, customers enjoy the first 31 days for free, which shows Proxoifier’s commitment to customer satisfaction. The pricing for using Proxifier after the trial period is $39.95.
What is Proxifier used for?
Proxifier is a powerful tool designed to enable network applications that do not natively support working through proxy servers to operate through a SOCKS or HTTPS proxy and chains. Its primary uses include ensuring privacy, accessing blocked resources, and managing network traffic, making it indispensable for individuals and organizations looking to enhance their online security and circumvent internet restrictions.
Is it easy to integrate Proxifier with NetNut Proxies?
Yes, integrating Proxifier with NetNut Proxies is straightforward, thanks to NetNut’s user-friendly setup and Proxifier’s versatile configuration options. The process involves a few simple steps to configure Proxifier with NetNut’s proxy details, allowing users to quickly start routing their applications’ traffic through NetNut’s secure and reliable proxy network, enhancing both privacy and access to online resources.