How To Use Chrome Browser Proxy Settings
Chrome is a popular free web browser on mobile phones and desktops. Developed by Google, it was designed to be fast, secure, and customizable. Keeping online activities private and safeguarding personal data has become paramount. Therefore, it becomes necessary to discuss proxy configuration on Chrome. A proxy acts as a middleman between your browser and the internet. Internet users can rely on Chrome proxy for various purposes. In this article you’ll learn how to set up a proxy on Chrome as well as the benefits it can provide!
What Is A Proxy?
A proxy acts as an intermediary between a user’s device and the internet, allowing requests to be routed through a separate server. This setup helps mask the user’s IP address, enhancing privacy and security online. By using a proxy, users can access geo-restricted content, manage internet traffic, and improve browsing performance. Proxies come in various types, such as HTTP, HTTPS, SOCKS, and transparent proxies, each serving different functions and offering distinct advantages depending on the specific needs of the user.
What Is A Proxy For Chrome?
A proxy for Chrome is a configuration that routes your web traffic through a proxy server when using the Google Chrome browser. This setup allows users to mask their IP address, enhance their online privacy, and access content that may be restricted in their region. By using a proxy with Chrome, users can also improve their browsing security and manage internet traffic more effectively. Proxies for Chrome can be easily configured through the browser’s settings or by using proxy extensions, providing a flexible and user-friendly way to control how internet data is accessed and transmitted.
Understanding NetNut Proxy Configuration
There are various proxy types so when integrating NetNut proxies, choose HTTP or SOCKS5 protocol.
This is an example of a proxy string for a browser:
USERNAME-stc-uk-sid-123456789:PASSWORD@gw-am.netnut.net:5959
Step 1: Hostname Configuration
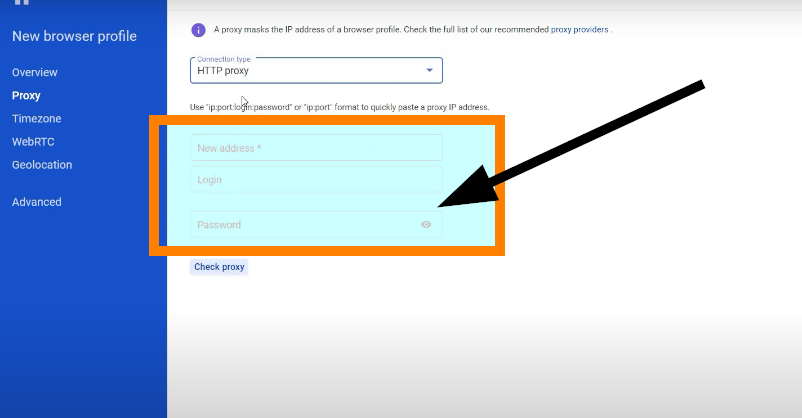
Copy the hostname/server address provided by NetNut
Example: Type gw-am.netnut.net into the host field if you are using HTTP protocol. Alternatively, type gw-socks-am.netnut.net for SOCKS5 protocol
Step 2: Port number Configuration
The Port number for NetNut HTTP proxies is 5959 and 9595 for SOCKS5
Step 3: Username Configuration
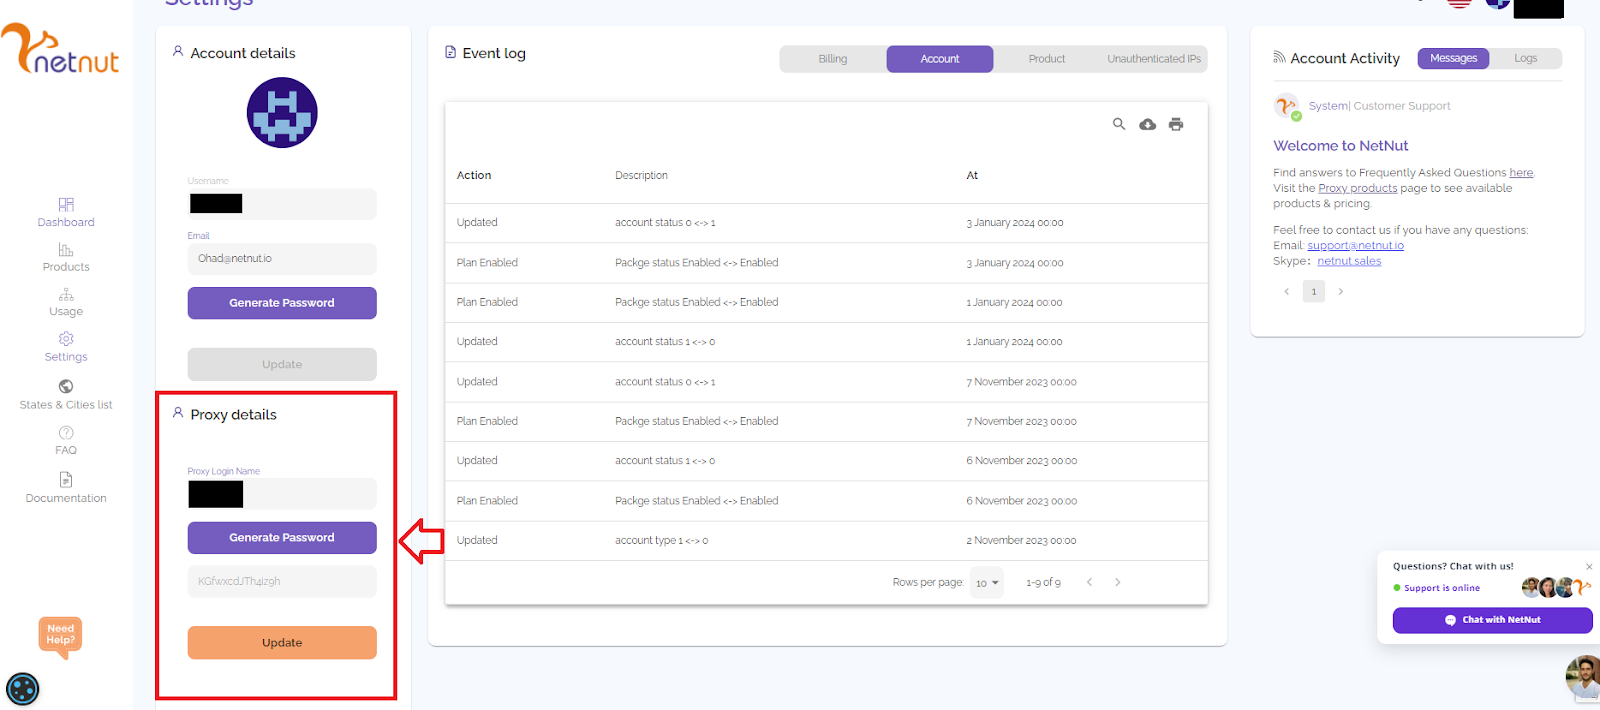
Username is your login, which you can find in your NetNut account in Settings -> Billing.
Proxy-type is the proxy type that you use. NetNut provides three different proxy types depending on your subscription plan. Your username should have three components including your user ID, type of proxy( residential, datacenter, static) and target country.
- dc — datacenter;
- res — rotating residential proxy;
- stc — static residential proxy.
Country is the country whose IP addresses will be used for connection. You can choose “Any,” in which case any available country will be used, or you can provide the ISO code of a specific country from the list of NetNut’s available countries: e.g., jp (Japan), fr (France).
Example: ticketing123-res-us
This is where you get the proxy username and password from the customer portal. You can also get in touch with your account manager if you’d like additional assistance.
Step 4: Consistent IP session
While NetNut provides rotating IP addresses, you may want a static IP address. This can be useful when you want to maintain your session via the same IPs. Then you need to incorporate a session id (SID) with your username.
How do you choose a SID?
- Choose a number between 4 to 8 digits
- Ensure the numbers are random and non-sequential to protect your IP address
For example: ticketing123-stc-us-SID-435765
Step 5: Proxy password
Insert the confidential NetNut proxy password
How to Set Up Chrome Proxies on Windows
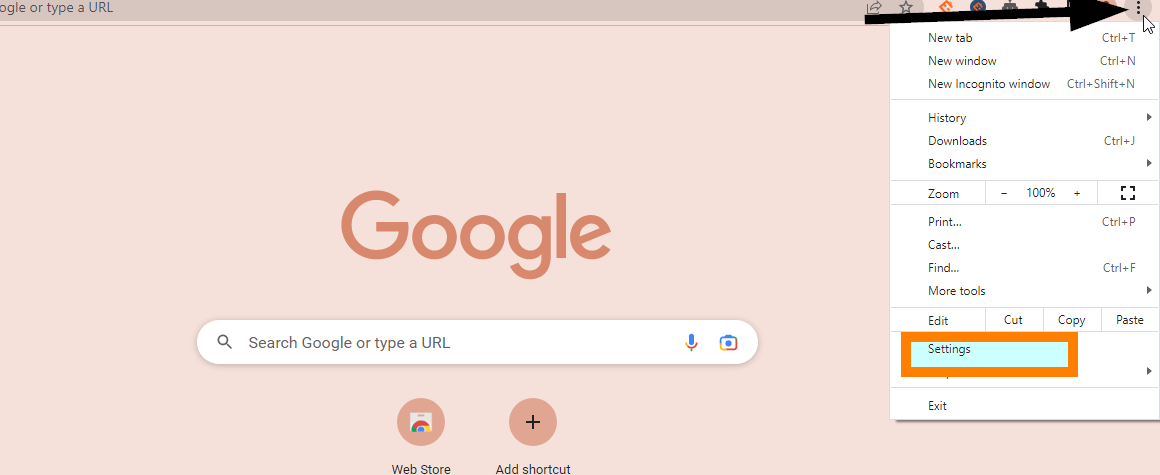
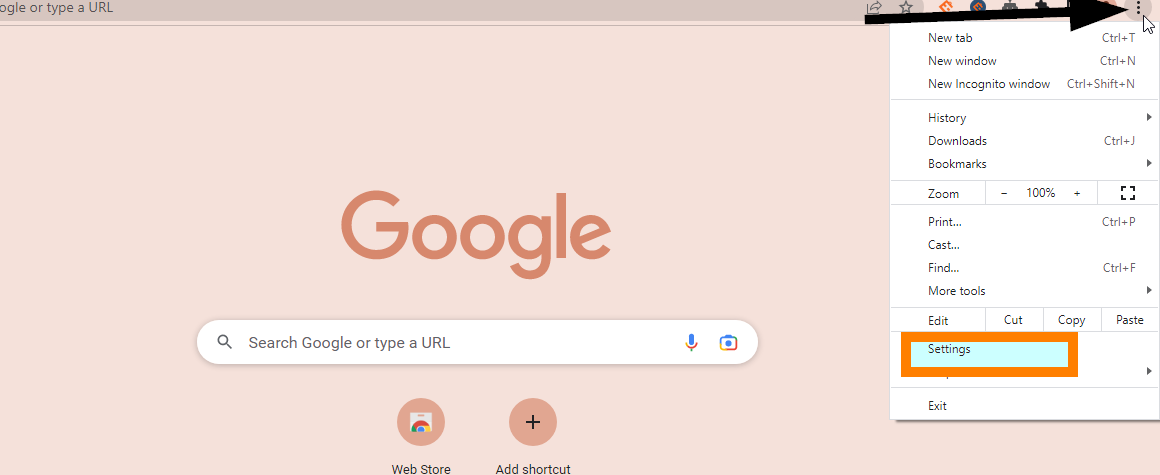
Step 1: Open the Chrome browser and click on the three dot menu icon and select Settings
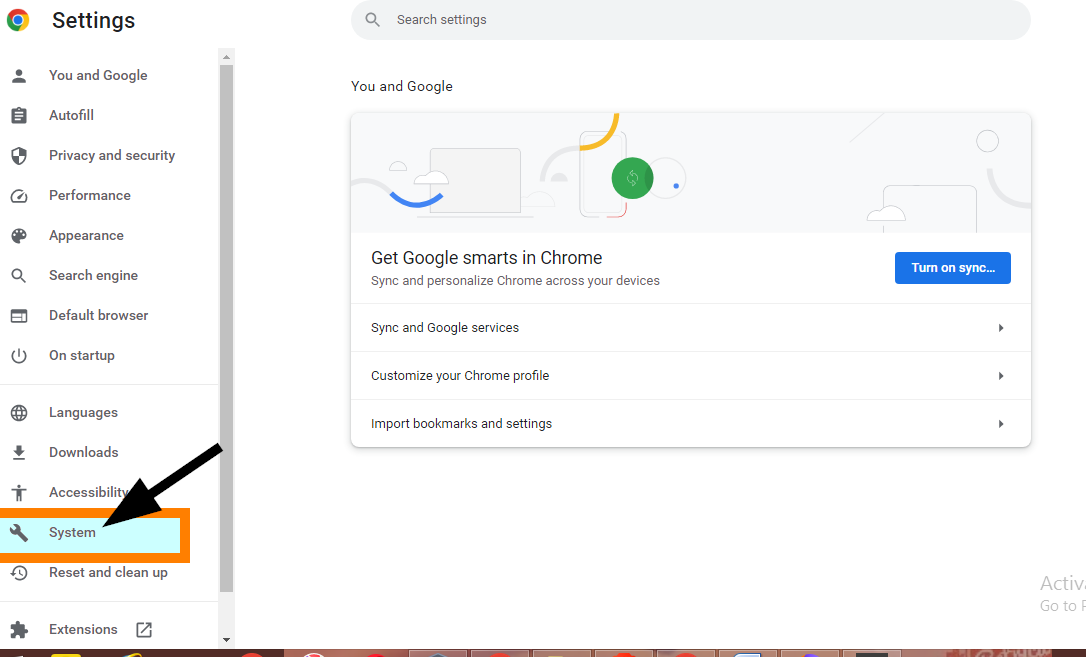
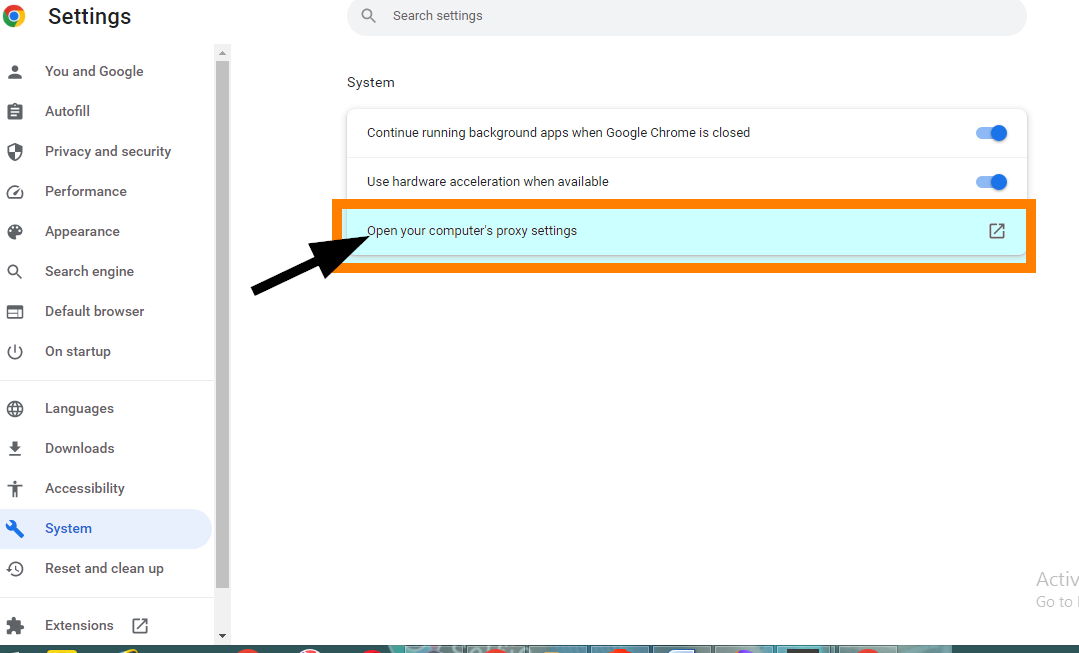
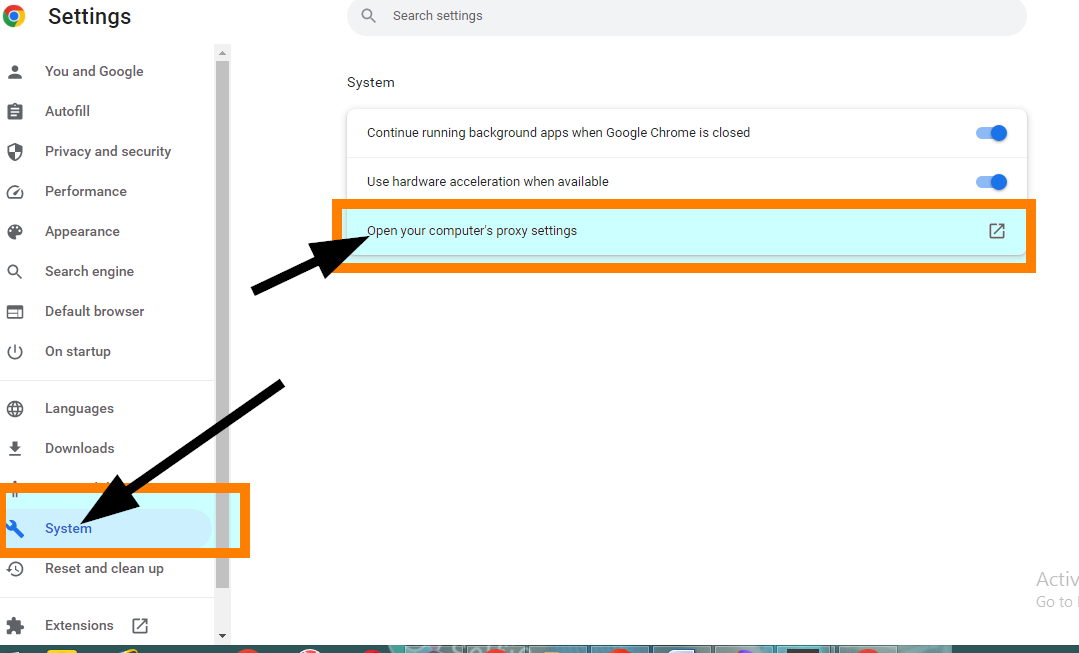
Step 2: From the menu on the left, select System
Step 3: Select Open your computer’s proxy settings
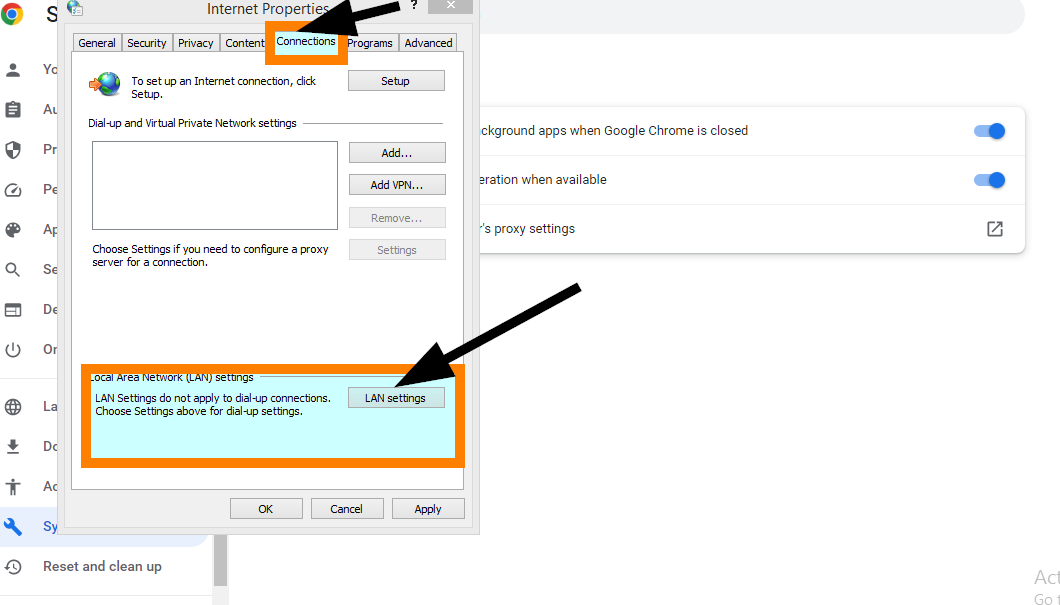
Step 4: In the Internet Properties dialog box, click on the “Connections” tab. Locate and click on LAN Settings
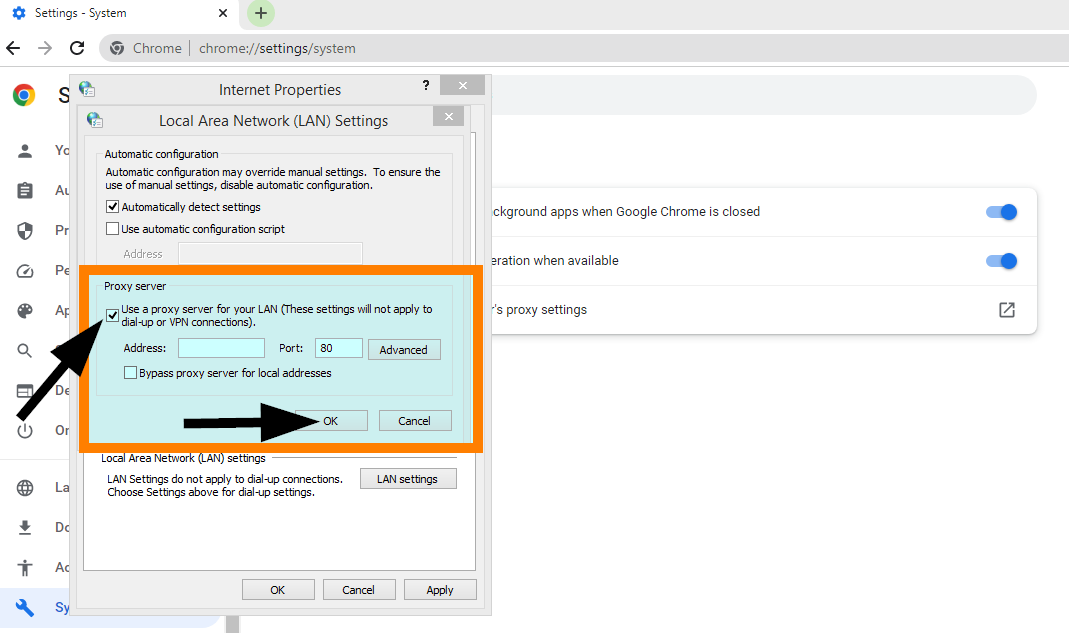
Step 5: In the LAN settings window, find the Proxy Server section. Tick the box that says Use a proxy server for your LAN to enable the use of a proxy. Enter your NetNut proxy details including IP address, port, username, and password. Click on OK to save the configuration.
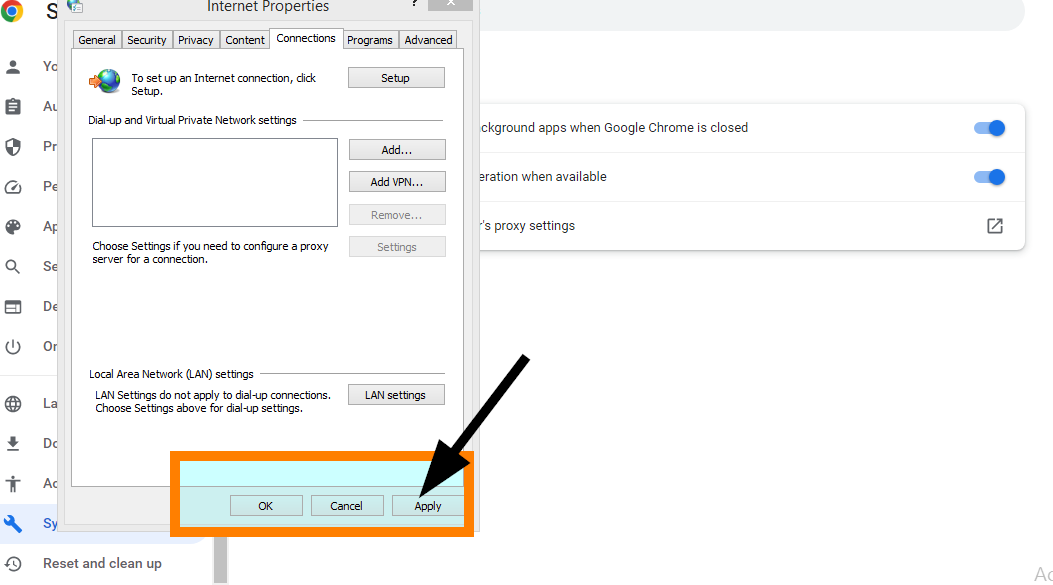
Step 6: On the connections page, select Apply to integrate the configurations
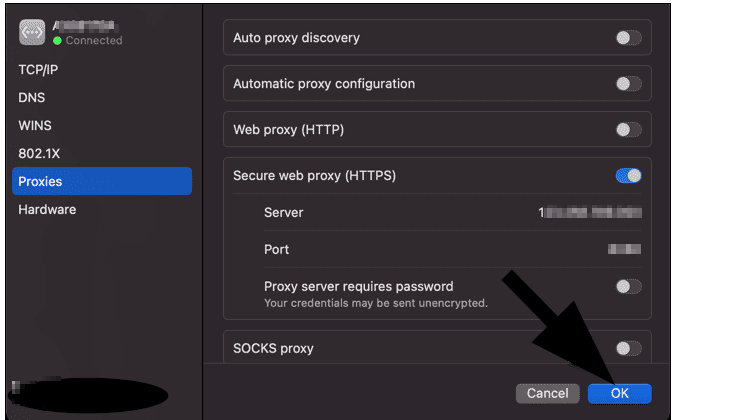
How to Set Up Chrome Proxies on Mac
Step 1: Open Chrome and click on the three dots menu icon. A drop down menu will appear, scroll down and select Settings
Step 2: Choose System from the menu on the left side of the browser and click Open your computer’s proxy settings
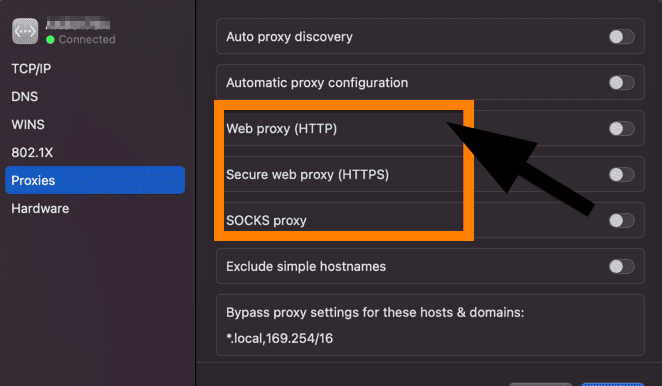
Step 3: A list proxies will be displayed, toggle on HTTP or SOCKS option
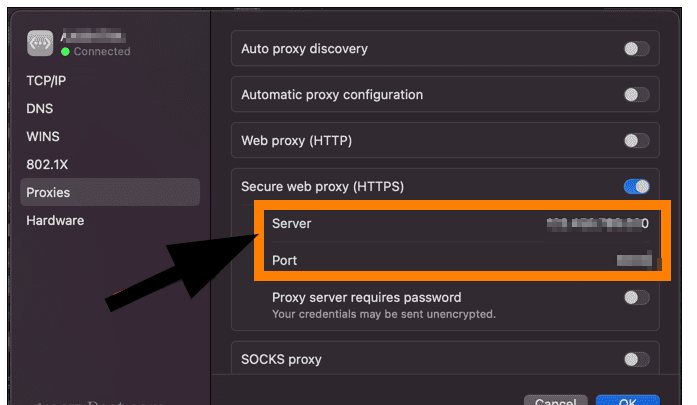
Step 4: Enter your NetNut proxy details including IP address, port, username, and password
Step 5: Select Ok to integrate the proxy configuration
Step 6: Open a new browser tab to authenticate your proxy settings. Enter your NetNut credentials including username and password and Sign in for optimized security.
What Are The Benefits of a Proxy for Chrome?
Using a proxy for Chrome offers numerous benefits, including enhanced privacy and security. By routing your internet traffic through a proxy server, your IP address is masked, making it more difficult for websites and malicious actors to track your online activities. Proxies also enable access to geo-restricted content, allowing you to browse websites and stream media that might otherwise be unavailable in your region. Additionally, a proxy can improve browsing performance by caching frequently accessed content and reducing load times. For businesses, proxies can help manage and monitor employee internet usage, ensuring compliance with company policies.
Final Thoughts On Proxies For Chrome
This guide has examined how to configure NetNut proxies on Chrome for Windows and Mac users. Google Chrome is a web browser that is easy to use and allows you to conveniently browse the web. However, if you want privacy and security online, you need to integrate proxies from a reputable provider like NetNut..
Do you want to learn how to integrate NetNut proxies with other tools? Be sure to check out other NetNut integrations.


