What is Chromebook?
Generally, there is no doubt that online privacy and security have become increasingly important. With the rise of cyber threats and data breaches, protecting your personal information while browsing the internet is essential. Whether you’re checking your emails, or simply scrolling through social media, every online activity has the potential to expose your sensitive data.
This is where the concept of online privacy comes into play. Ensuring that your information remains private and secure while you’re connected to the internet can help prevent unauthorized access and protect your identity. Hence, the need for Chromebook proxy server.
For Chromebook users, proxy servers can be particularly useful. Chromebook is a lightweight and easy-to-use laptop that runs on Google’s Chrome OS. However, like any other device, Chromebook are still vulnerable to certain online threats. By using a proxy server, Chromebook users can add an extra layer of cyber security to their online activities.
A Chromebook proxy server is a server that acts as an intermediary between your device and the internet. When you use a Chromebook proxy server, your HTTP requests (like opening a website) go through the proxy server first. The proxy server then sends the request to the intended website on your behalf. Once the website responds, the proxy server forwards the data back to your device.
Do you need to learn how to configure a proxy server on your Chromebook but don’t know how to get started? This article provides a comprehensive guide on how to configure your proxy settings on Chromebook.
Let’s take a look at these steps:
How to Configure Chromebook Proxy Server
Step 1: The need for premium proxy services begs for the configuration of proxy settings on Chrome. Almost every computer has Chrome installed on it already. However, in case it is not installed, you can download chrome and install the browser on your PC. Open the browser after download.
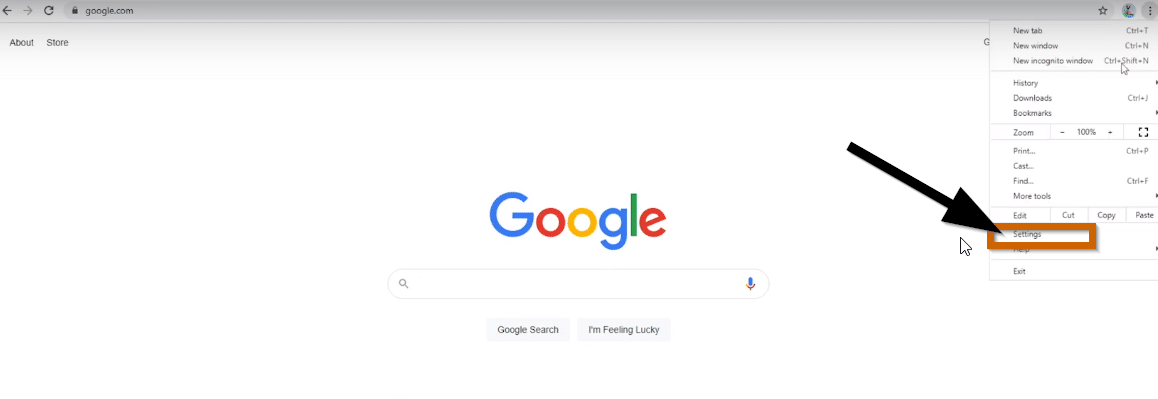
Step 2: From the homepage of the browser, click on the chrome menu on the top right corner. Then click “Settings”.
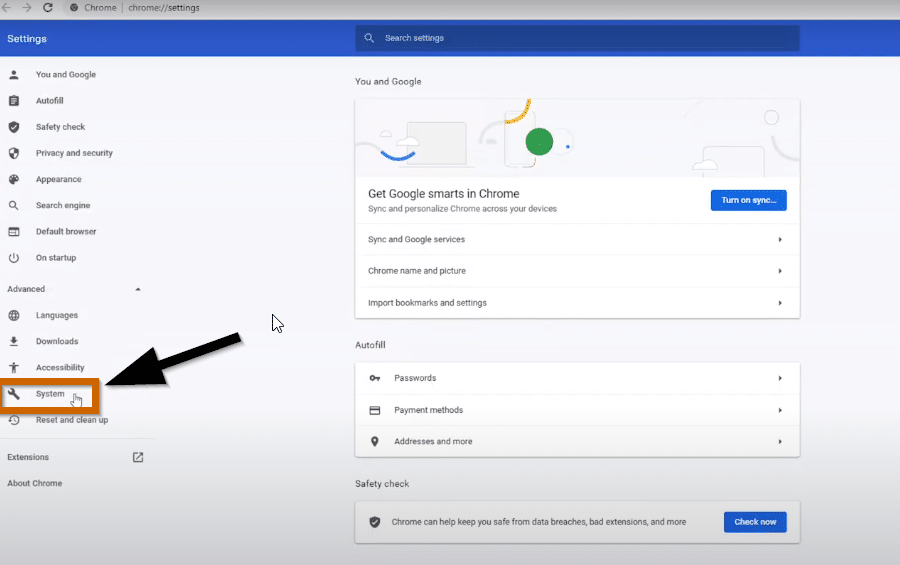
Step 3: Next, click on ‘Advanced’, then open ‘System’. Note, if you can’t find the proxy settings, you might need to update your chrome to the latest version.
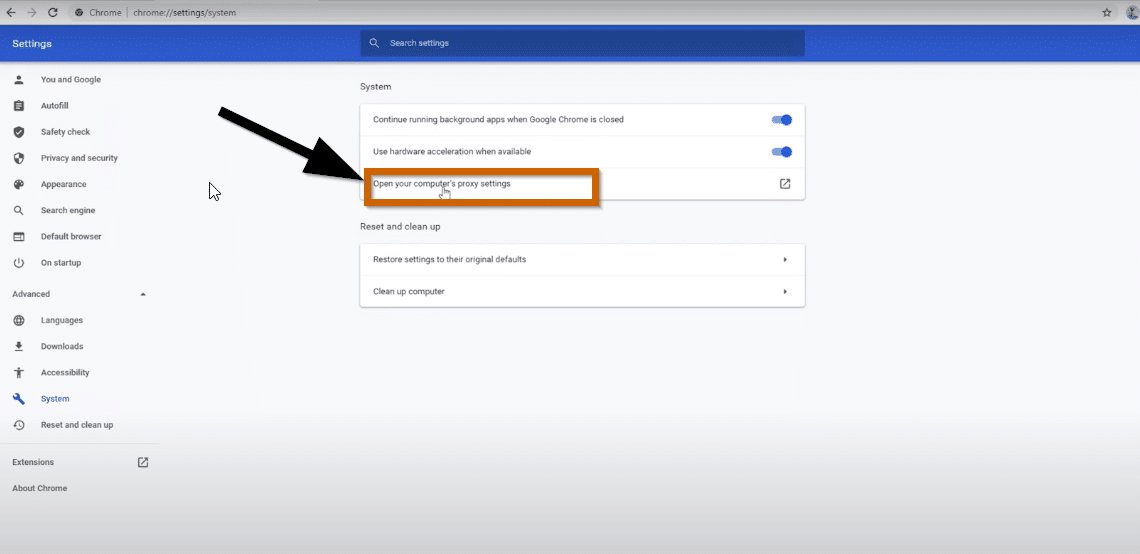
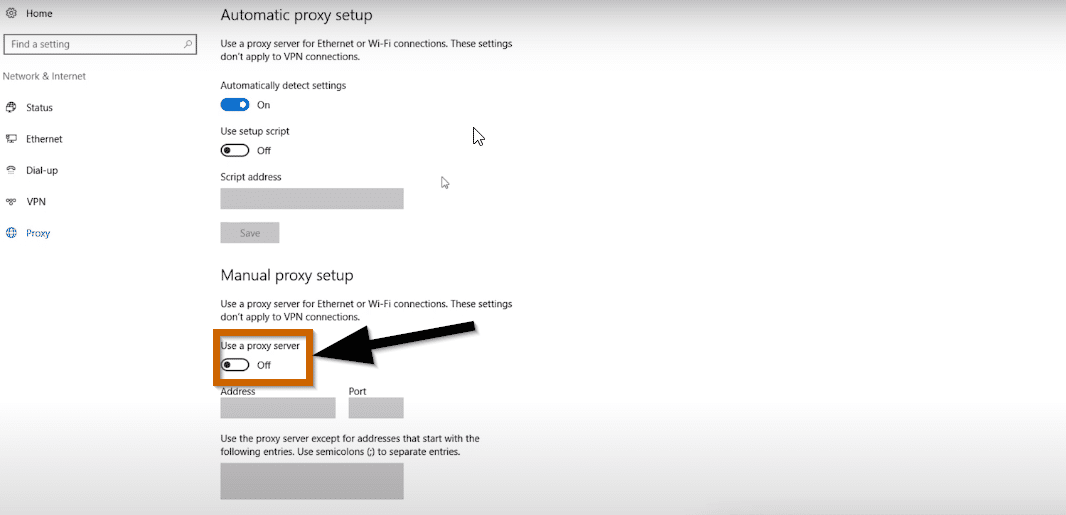
Step 4: In system, select ‘Open your computer’s proxy settings’.
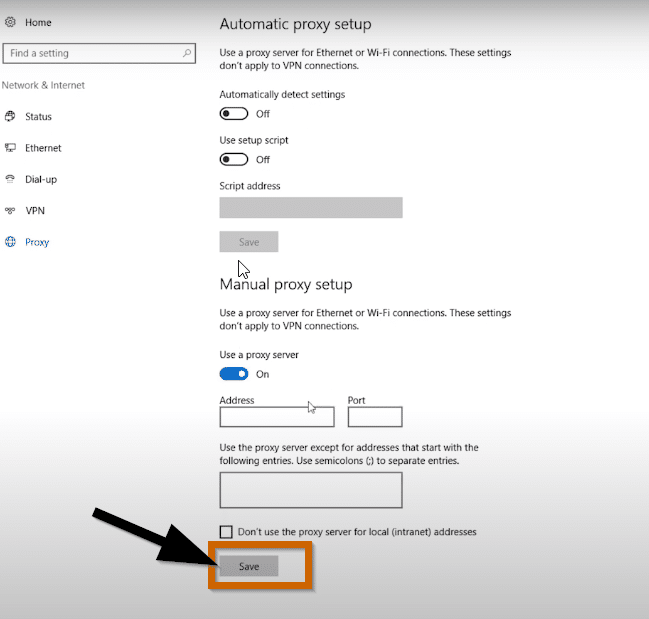
Step 5: While in the proxy settings, enable manual proxy setup and configure the proxy server.
Understand that, there are various proxy types. So, when integrating NetNut proxies, choose HTTP, Socks 4 or Socks 5 proxy. Then complete the configuration using the details below.
- Hostname Configuration
Copy the hostname/server address provided by NetNut
Example: Type gw-am.netnut.net into the host field if you are using HTTP protocol. Alternatively, type gw-socks-am.netnut.net for SOCKS5 protocol
Adjust the prefix based on your target country. Let’s say your preferred country is the US, then the hostname will be
- Port number Configuration
The Port number for NetNut HTTP proxies is 5959 and 9595 for “SOCKS5”
- Username Configuration
Username is your login, which you can find in your NetNut account in Settings -> Billing.
Proxy-type is the proxy type that you use. NetNut provides three different proxy types depending on your subscription plan. Your username should have three components including your user ID, type of proxy( residential, datacenter, static) and target country.
dc — datacenter;
res — rotating residential proxy;
stc — static residential proxy.
Country is the country whose IP addresses will be used for connection. You can choose “Any,” in which case any available country will be used, or you can provide the ISO code of a specific country from the list of NetNut Available Countries: e.g., jp(Japan), fr(France).
Example: ticketing123-res-us
- Consistent IP session
While NetNut provides rotating IP addresses, you may want a static IP address. This can be useful when you want to maintain your session via the same IPs. Then you need to incorporate a session id (SID) with your username.
How do you choose a SID?
- Choose a number between 4 to 8 digits
- Ensure the numbers are random and non-sequential to protect your IP address
For example: ticketing123-res-us-SID-435765
- Proxy password
Insert the confidential NetNut proxy password
Step 6: After filing the details, click on ‘Save’ and your proxy settings will be saved automatically.
Congratulations! Now you can browse the internet using the configured proxy. These outlined steps can be followed for both Windows and MAC devices.
Conclusion
Setting up a proxy on Chrome is a strong first step in taking back control of your internet privacy. By putting these settings into place, you may protect your online actions from prying eyes and take advantage of several chances to access content that is limited to a certain region and keep your online presence more safe.
Look through other “how-to articles” to gain knowledge about how to integrate NetNut proxies with various browsers.
You can contact us if you have any questions regarding choosing the best proxy solution for your needs.
Frequently Asked Questions and Answers
What is the difference between a Chromebook Proxy server and a VPN?
A Chromebook proxy server routes your internet traffic through an intermediary server, masking your IP address but typically not encrypting your data. A VPN (Virtual Private Network), on the other hand, encrypts all your internet traffic and routes it through a secure server, providing higher levels of security and privacy but often at the cost of slower speeds.
Are there free proxy servers available?
Yes, there are free proxy servers available. However, they often come with limitations such as slower speeds, less reliability, and potential security risks. It is essential to research and choose a reputable free proxy service to avoid these issues.
Can I switch between different proxy servers on my Chromebook?
Yes, you can switch between different proxy servers on your Chromebook. Simply go to your network settings, enter the new proxy server’s IP address and port number, and save the changes. This flexibility allows you to choose the best proxy server for your needs at any given time.